After teaching first grade, I transitioned into a new role doing reading intervention. I absolutely. love. this. job. One thing I’ve really improved upon after taking this job is my phonics instruction. This post is really about reading intervention, but I titled it phonics intervention because so much of what I do for my students revolves around word study.
Phonics is a critical component of reading instruction, especially in the early stages. It’s even more important for students who struggle with reading. Research supporting explicit, systematic phonics instruction is not new. In fact, it spans more than 50 years! The National Reading Panel (2000) was a comprehensive review of decades of reading research. It found that the most effective reading instruction includes phonemic awareness, phonics, guided oral reading, and comprehension strategies. Most importantly for this post, it found that systematic phonics helps all beginning readers, especially those who struggle.
{Update since original post} Since then, research in structured literacy has reinforced these findings, showing that explicit, systematic phonics instruction paired with opportunities to apply skills in reading and writing benefits all students and is essential for those with reading difficulties.
When I shifted more of my instructional time from sight word flashcards and leveled readers to targeted phonics instruction, I saw my struggling readers make greater gains and develop more confidence. I still incorporate plenty of other literacy activities, but now I make a conscious effort to include high-quality phonics instruction every single day.
So, what is good phonics instruction? These principles guide my teaching.
Part 1: Key Elements of Effective Phonics Intervention
Phonics Instruction Should Be Explicit
Teach the skill directly.
This means you name it, model it, and give students plenty of guided practice before expecting them to use it on their own. Don’t just hope they figure out that “sh” makes the /sh/ sound by spotting it in a few words here and there. Instead, tell them outright: “These two letters together make the /sh/ sound.” Show examples, read them together, and let them practice. This kind of clear instruction removes the guesswork and gives students the confidence to apply the skill the next time they see it.
Phonics Instruction Should Be Systematic
Teach skills in a clear, logical order, moving from the simplest patterns to the more complex ones.
A systematic approach means you know exactly what you’ve taught, what comes next, and what to review along the way. I admit it, I used to be all. over. the place. But I learned that I need to be much more intentional with the way I teach. There’s science behind this! We are literally rewiring some of these kids’ brains, forming new pathways that need repetition to really stick. The more systematic and consistent we are with how we introduce and practice skills, the more likely our students will remember them.
Being systematic has to do with both a framework and routines. You’re not just following a plan, you’re creating a predictable structure. A framework is the consistent lesson structure you follow each time. Routines are the specific activities you use within each part of that framework. Together, the framework and routines give students a sense of predictability that helps them focus on learning the skill, not figuring out what’s coming next or figuring out new routines.
To see my systematic units, click here.
Phonics Instruction Should Be Sequential
Teach skills in a purposeful order that builds on what students already know.
Sequential instruction means you’re not picking skills at random. You’re moving step-by-step from simple to more complex patterns. For example, you might start with CVC words, then add digraphs, then consonant blends, and later long vowels and vowel teams. Each step prepares students for the next one. This helps struggling readers connect new learning to prior knowledge, making it easier for them to retain and apply skills.
This was something I did not understand before. I thought, What does it matter? I’m teaching all the skills at some point! Looking back, I realize that by not having a step-by-step roadmap for where I was going, I was leaving some stuff out and not teaching other things. More than that, I wasn’t giving my new or struggling readers the opportunity to be successful by giving them texts and word work using only phonics patterns that they have actually been taught.
For example, when I’m teaching digraph sh, I’m not including words like “shark” and “sheep” because at that point in my scope and sequence I have not yet taught r-controlled vowels or vowel teams.
If your program doesn’t have a sequence for you, there are several to choose from, that are very similar. If you would like to see the phonics sequence I use, click here.
Phonics Instruction Should Be Cumulative
Each lesson builds upon the previous lesson.
Each new skill should be practiced alongside earlier ones, so you have constant opportunities for review. For example, when I teach vowel teams, I still include silent e words and words with short vowels in their practice, because I know my students need that extra reinforcement. This is especially important for students receiving intervention. They need to revisit skills many times before they truly stick. But truly, this benefits all students! This steady layering of review and new learning helps strengthen those neural pathways we’re working so hard to build!
Multi-Sensory Instruction Can Enhance Learning
Engage more than one sense at a time to help students connect and remember what they’re learning. This doesn’t have to mean elaborate activities with sand or playdough. It can be as simple as saying the sounds while writing the letters, tracing a word on the table while spelling it aloud, or tapping out each sound with your fingers before writing it. The key is combining visual (seeing the letters), auditory (hearing and saying the sounds), and kinesthetic/tactile (moving or touching) elements so the learning sticks. Multi-sensory teaching keeps lessons active, engaging, and memorable, especially for students who need that extra boost to make connections.
While multi-sensory teaching is often recommended for students with reading difficulties, the research on its effectiveness is mixed. Some studies suggest the benefit comes less from the “multi-sensory” element itself and more from the fact that it’s paired with explicit, systematic instruction. In other words, tracing letters in sand won’t teach phonics on its own, but when it’s part of a well-planned lesson, it can boost engagement and help students connect what they see, hear, and do.
Part 2: What Does Phonics Intervention Look Like? (A Framework)
Below is what thorough phonics intervention looks like for me. It’s essentially the framework I follow with my students.

I am beginning at the phase where students have developed phonemic awareness and know most of their letters and sounds. They are in the beginning stages of learning to read.
Phonics Intervention Framework: Warm-Up
Every lesson starts with a warm-up to get students’ brains and ears ready for reading. This part is quick- just a few minutes! But it sets the tone for the lesson and gives students a chance to activate the skills they’ve already learned before tackling something new.
Phonemic Awareness
Phonemic awareness is the ability to hear, identify, and manipulate the individual sounds (phonemes) in spoken words. In the very early phases, my warm-up may begin with a quick phonemic awareness drill. These only take a minute or two, but they get students tuned in to the sounds in words before we move into print. Phoneme segmenting and blending are the essential phonemic awareness skills for reading and spelling:
- Segmenting: I say a word aloud, students repeat it, then break it into individual sounds. For example, I say “shop,” they repeat it, and then say /sh/ /o/ /p/ .
- Blending: I say the individual sounds, they blend them to say the word. Sometimes I use a puppet for this, and the students “translate” what the puppet says. This is always a big hit!
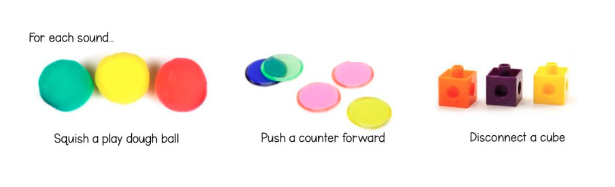
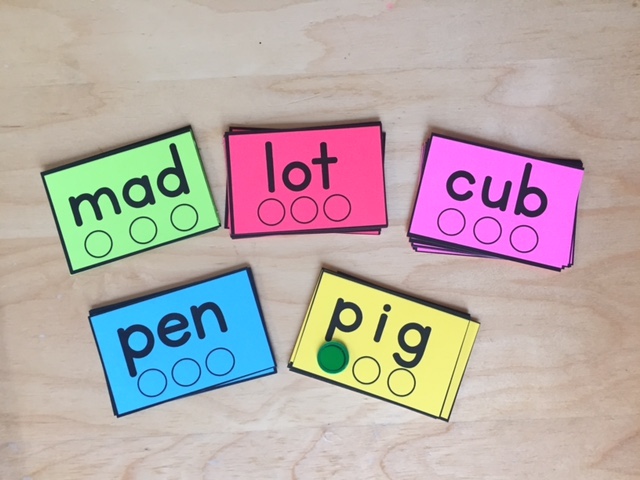
For intervention students, adding a manipulative can be especially helpful. I often use color-coded counters or chips for a quick visual and tactile support. The physical act of moving a counter for each sound gives them a concrete way to track the phonemes.
Visuals are always helpful, and it’s also nice to shake things up a bit with kids. If you are looking for more activities for phonemic awareness, click HERE.
{Update since original post}
Since I first wrote this, there’s been a lot of discussion about whether oral-only phonemic awareness activities are necessary. The research is pretty clear that phonemic awareness is most powerful when it’s connected to the alphabetic principle (matching sounds to their graphemes). However, there’s also research showing that oral-only PA instruction can be beneficial for some struggling readers, especially in the very beginning, because it reduces cognitive load. Without letters on the table, students can focus entirely on hearing and manipulating sounds. This phase is temporary, but it can give certain students the solid sound foundation they need before adding print.
Sound-Symbol Visual Drills
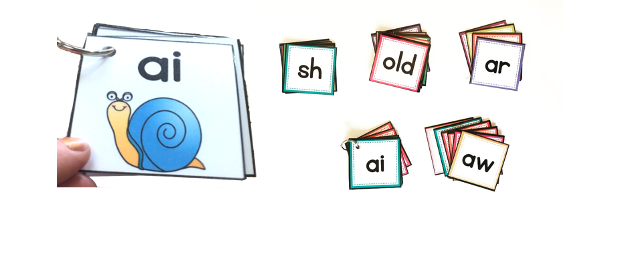
Each day, I do a quick sound-symbol drill to connect speech to print. You are only focusing on graphemes you have already taught. The goal isn’t just accuracy- it’s automaticity! We want students to build automatic recognition of graphemes (letters or letter combinations) and the sounds they represent. For intervention students, this automaticity is critical and often lacking! Having this automaticity frees up brain space for blending, decoding, and comprehension instead of getting stuck on individual sounds. I have a post that goes more into automaticity HERE.
A sound-symbol drill can be as simple as flipping through flashcards or pointing to graphemes in a chart while students say the sounds.
You can also change up the format, like these pictures show:
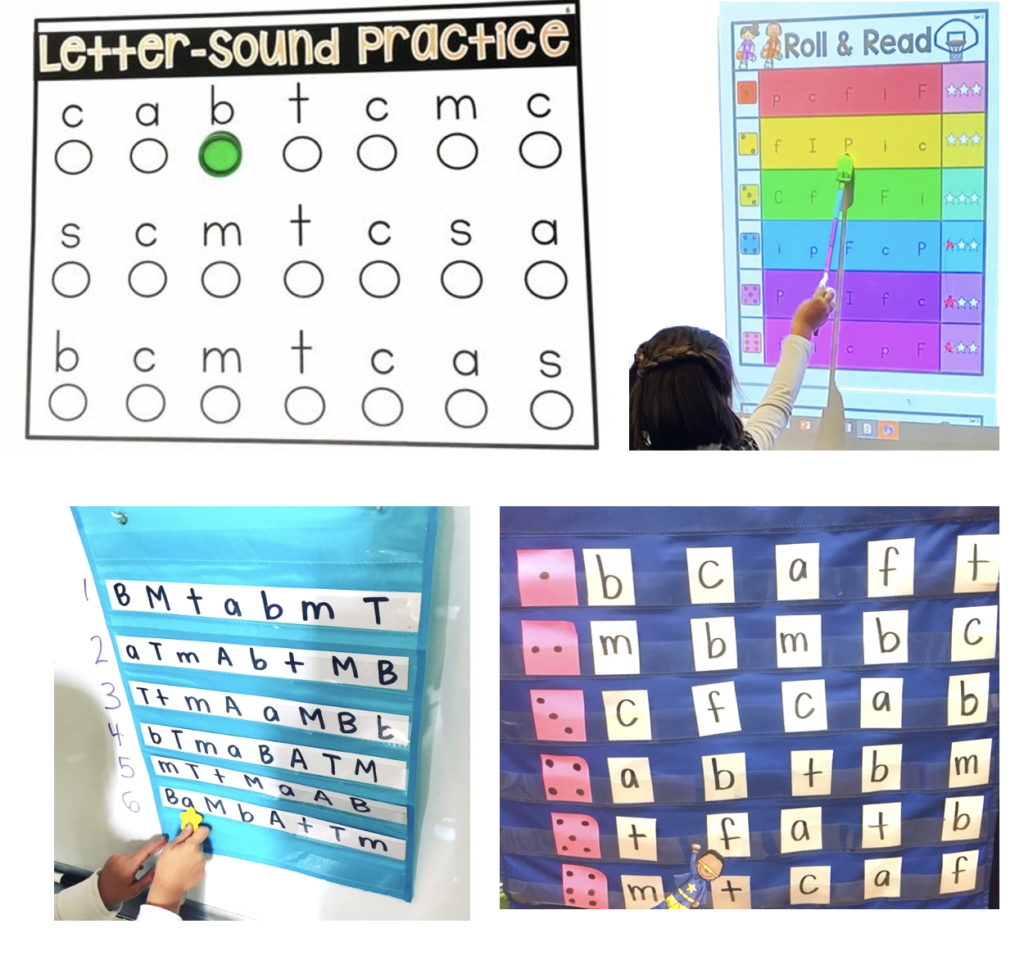
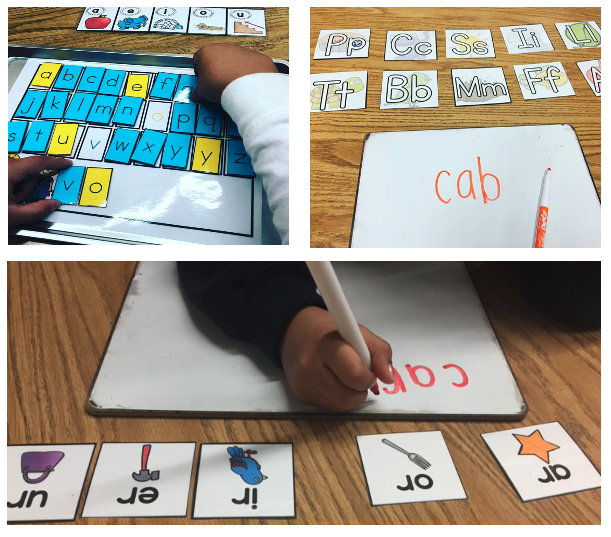
Top left Picture: You can do this Automaticity Drill as a group or each student can have their own page to practice. Spend 1-2 minutes sliding the circular chip across the page while saying the sound that goes with each letter.
These other three pictures show the same activity that I’ve done at different times with a small group or a whole class. Put the letters in a pocket chart or write on chart paper randomly. Point to the letters and students quickly give the sounds. Make it a game by adding a die. (Roll the die. Read the row with the number you land on.) The picture from the top right is from this file.
The pictures above show letters of the alphabet, but you can do the same with digraphs, vowel teams, or r-controlled vowels. Since it’s a “warm up”, it is meant to be done quickly, but it is very effective.
Sometimes, I’ll do a warm-up drill that focuses on rimes (word ending). The picture below show a quick automaticity drill that I do to review.

Phonics Intervention Framework: Introduce New Learning
When introducing a new phonics skill, I always start with the sounds before the letters. Beginning with pronunciation gives students an anchor. They connect something unfamiliar in print to something familiar in speech. For example, if I’m teaching the digraph sh, we start by saying /sh/ and identifying it in familiar words.
Next, I connect that familar sound to the new grapheme (letter or letter combination) that represents it. Explain directly: “These two letters together make the /sh/ sound.” This step bridges their phonemic awareness to their phonics knowledge.
Teach New Skill
From there, I explicitly teach what the pattern is, how it works, and examples of it in words. I think aloud as I demonstrate. I always use a keyword visual that they can refer back to. This can help students recall the sound and spelling when they encounter it later.
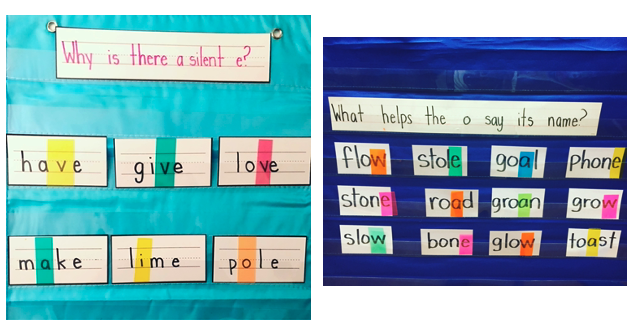
The phonics skill can be a grapheme, like <sh> spells the /sh/ sound. The phonics skill can also be a pattern. For example, if you’re teaching silent e, the direct teaching is that usually when they see the letter pattern vowel-consonant-e, the letter e is silent and the first vowel makes its long sound.
After you have directly taught the new skill, you will show your students examples of words with that new phonics pattern.
Decoding Practice
Once the new skill has been introduced, we move into decoding practice. This starts with “I do” (Modeling), “We do” (Guided Practice), and ” You do” (Independent Practice).
Model (I Do)
I model decoding words that include the new skill, thinking aloud as I go. For example, “I see these two letters together, sh, and I know they make the /sh/ sound. Watch and listen as I tap these sounds: /sh/ /o/ /p/”.
I often use color-coded letter tiles so students can see the pattern clearly.

I like to keep letter tiles on my magnetic whiteboard at all times for easy access. Using a pocket chart is also a great way to teach a small or large group.
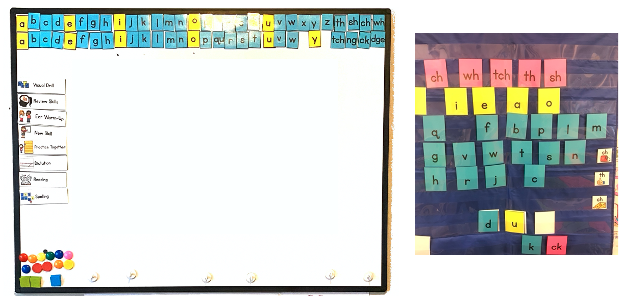
If you need letter cards to print out, you can use these FREE letter cards:
Guided Practice (We Do)
Next, we read words together. I guide them to apply the new skill correctly.
- This might start out as more of a choral decoding: “I will tap under the letters. You will say the sounds with me. Then, we’ll blend the sounds to read the word”.
- As students gain confidence, I shift the routine. They first whisper-read the word to themselves, giving them a chance to apply the skill independently. Then we read it together as a group. This way, they get that moment to work through it on their own, followed immediately by reinforcement in a guided setting.
Throughout this step, I continually model how to read the words while reminding students of the pattern, or “rule“. Over time, I release more responsibility to them, having them explain the rule back to me. I ask prompting questions like: “What sound does the <a> represent?” “What is the job of the <e>?” “Which vowel sound do you hear?” or “How do you know the e will make the other vowel say its name?” This keeps them actively thinking about the pattern and applying it as they read.
I also like to mix in quick, targeted questions or sorting activities during guided decoding. These little checkpoints give me a window into how students are processing the skill and whether they can explain their thinking. It turns reading practice into an active problem-solving process rather than a passive exercise.
Independent Practice (You Do)
When students are ready, they read words on their own. This is where automaticity at the word level comes in: quick, targeted practice reading words in isolation to strengthen speed and accuracy.
During an intervention time, “independent practice” isn’t the same as what it would look like in the classroom. In the classroom, they really are likely practicing on their own. During your intervention time, your students are likely sitting right in front of you at your reading table. This is there time to practice decoding a set of words (either word cards or a page of words) using a whisper voice or in their head. During this time, I “listen in” with a student or two (rotating who I listen to). This becomes an informal assessment and a time when I can do some direct teaching or error-correction, if needed.
Spelling Practice
Encoding (spelling) is the flip side of decoding, and both strengthen each other. This follows the same gradual release process:
Model (I Do)
I model spelling a word that includes the new skill, saying each sound as I write or place letter tiles. For example, “The first sound is /sh/, so I write s and h together. The next sound is /o/, so I write o.” I talk through each step so students hear exactly how I’m mapping sounds to letters.
Guided Practice (We Do)
We spell words together, either using letter tiles or writing on whiteboards. At this time, students and the teacher are both spelling.
- Say the word and have students repeat it.
- Use the word in a sentence to connect to meaning.
- Together, tap the sounds in the word: /sh/ /o/ /p/.
- Match sounds to graphemes. At this point, some students will take off and spell the word on their own. Others will continue to follow along with you as you prompt: “What was the first sound? What letters spell the /sh/ sound?”
Independent Practice (You Do)
With independent practice, I simply say the word and use it in a sentence, and students spell it. They go through the process of encoding on their own while I observe and give quick corrections. This is an opportunity for an informal assessment. Look around to see who is having difficulty spelling the words and provide support, as needed.
Phonics Intervention Framework: Apply New Skill
The final step in my Phonics Intervention framework is having students use the new skill in reading and writing contexts. This bridges the gap between practicing in isolation and actually applying it while reading and writing connected text.
Reading with Decodable Texts
I start with decodable sentences or phrases that include multiple examples of the target skill alongside review words. Students can highlight or underline the pattern before reading to help them notice it in context.
From there, we move to decodable passages or books that match the skill. We read these aloud together, in pairs, or independently. As students read, I prompt them to use the decoding strategies we practiced earlier. Read more about decodable texts here (I also share my favorite decodable texts publishers).
Phonetically-controlled texts are so important for our very beginning readers and for our struggling readers. These texts give them an opportunity to apply the phonics skills they’ve learned without having to worry about guessing or seeing tons of words they don’t know and can’t decode. They can be successful with these texts, all the while strengthening those pathways in their brain. (To read more about reading and the brain, click HERE to see an old post with tons of information.)
This is also where we work on fluency. I might have students reread a short passage several times, focusing on accuracy first, then smoothness (working on phrasing with scooping), then expression. Read more about fluency here.
Finally, I like to include quick comprehension checks: retelling the passage, answering a question, or discussing a favorite part. This reinforces that the goal of phonics instruction isn’t just to decode, it’s to understand what we read.
Sentence Dictation
To apply the skill in writing, I use dictated sentences that include the new pattern plus review words. Students listen, repeat the sentence, then write it while applying accurate spelling, spacing, capitalization, and punctuation. This connects phonics to writing and reinforces both encoding and grammar in context. I keep sentences short and manageable so the focus stays on accurate application.
You get a two-for-one deal here because this improves both reading and writing. I have to admit, this is new to me, but I swear it is the missing piece to the puzzle with developing my students’ writing skills. Sentence dictation paves the way for students to be able to focus on content, rather than transcription skills.
Part 3: Phonics Intervention Activities
Now that you have the framework, or how I structure my phonics intervention time, we can talk about some of the high-impact activities I return to again and again in phonics intervention. They are used in different parts of the framework: during decoding, spelling, review, sentence reading or even warm-up, to reinforce skills and keep lessons engaging.
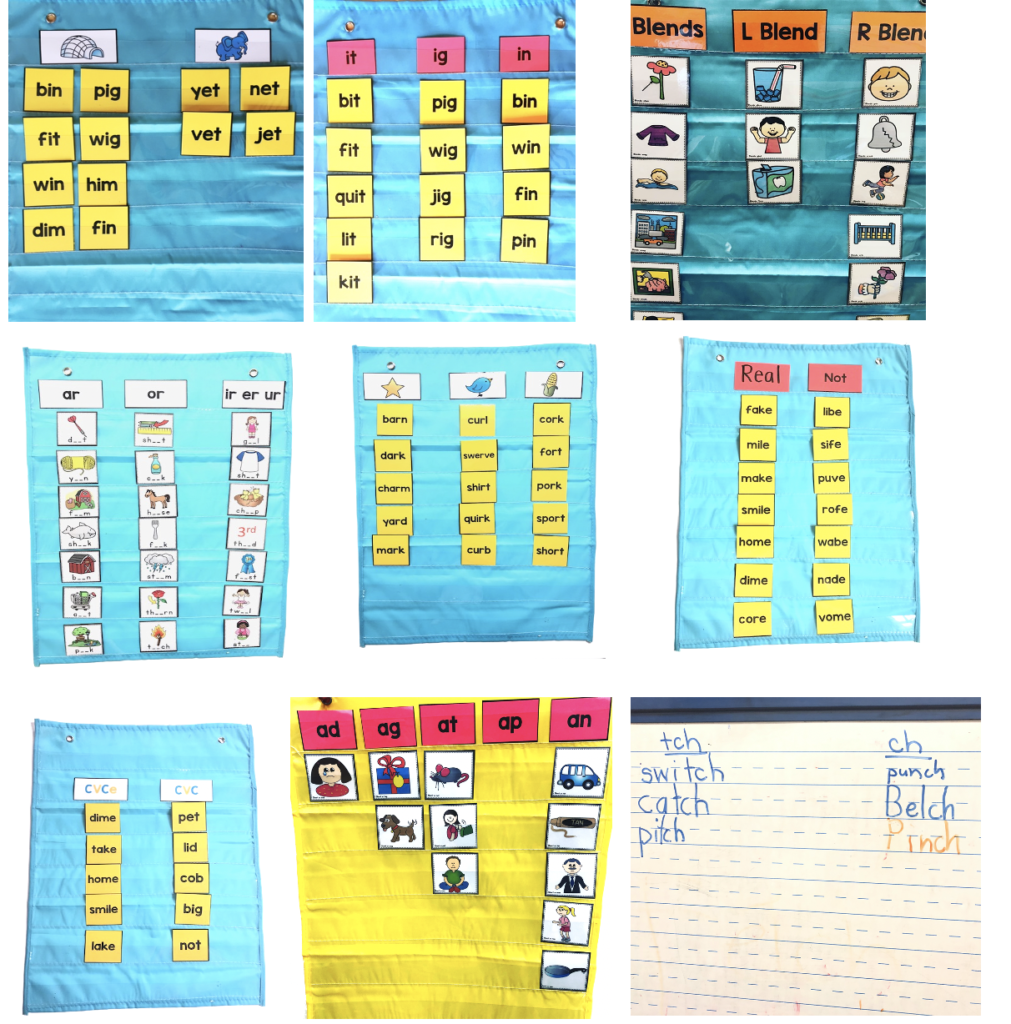
Activities for Decoding: Word Sorts
Word sorts are one of my favorite ways to reinforce a phonics skill while also reviewing past learning. Students read each word card and decide where it belongs: by rule, pattern, vowel sound, or whether it’s a real or nonsense word.
For intervention students, word sorts are powerful because they require active thinking. Instead of just reading a list of words, students have to analyze each one and make a decision, which deepens their understanding of the pattern.
Types of word sorts I use:
- Pattern Sorts: Sorting by specific spelling patterns (CVC vs CVCe)
- Rule Sorts: Sorting by a rule (When to use <tch> vs. <ch> or <ou> vs. <ow>)
- Real/Nonsense Sorts: Helps focus purely on decoding without relying on memorized words.
- Picture Sorts: Great for English learners or younger students still building phonemic awareness
- Yes/No Sorts – When I first introduce a new phonics concept, I might simply do a yes/no sort. For example, students read the word and determine if it has a short i or not. I know what you’re thinking—they can just look and see the i. But remember, this is a small group activity, so you’re ensuring they actually read the words. This gives them a clear task so they’re not just reading word cards for no reason. Plus, every time they read a card with a different vowel, you can point out the contrast in the sounds. To make it more challenging, use picture cards so they need to hear the correct vowel sound, then match to the letter. For example, they would see a pig and say the word, listening for the target sound.
Another option is a spelling-focused sort that doesn’t require students to read the words first. For example, after teaching <tch> vs. <ch>, I might say a word like stitch. Students write the word on their whiteboards, using what they learned in the lesson to decide which spelling to use. Then, I show them the correct spelling and explain why, often drawing sound boxes or using letter tiles to point out that a short vowel comes right before <tch>. Finally, we add the word to the correct column in the sort, (rewriting the word).
You can do word sorts whole group, in small groups, or independently as a literacy center.
If you are looking for cards for word sorts like the ones you see above, you can find them here:
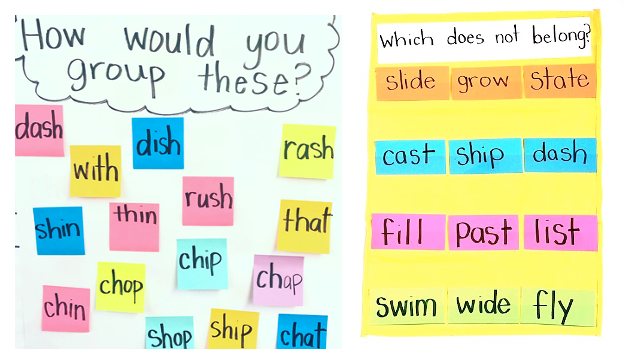
Analysis-Based Sorting
I like to include routines that push students to analyze and talk about words. These activities get them thinking beyond “sounding it out” and help them notice patterns, rules, and relationships between words. Below are two examples of this. They are more like an “open sort” where students have to think about how they would group the words.
Activities for Decoding: Drills for Automaticity
Quick, focused drills to help students read words accurately and effortlessly. Automaticity drills keep the skill fresh and strengthen the brain pathways needed for fluent reading.
This might include:
- Decoding Drills: Reading of word lists
- Fluency Grids: A grid of words that encourages repeated reading. You can put the same 5-6 words in each row (in a different order). This way, students read the same words over and over.
- Make it a game, like Roll and Read or Spin and Read.
For automaticity activities at the word level (including Roll & Read or Spin & Read or just plain grids), click here.
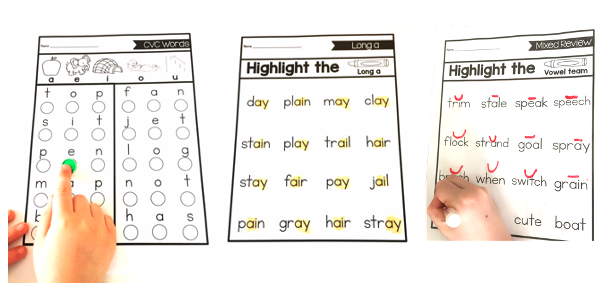
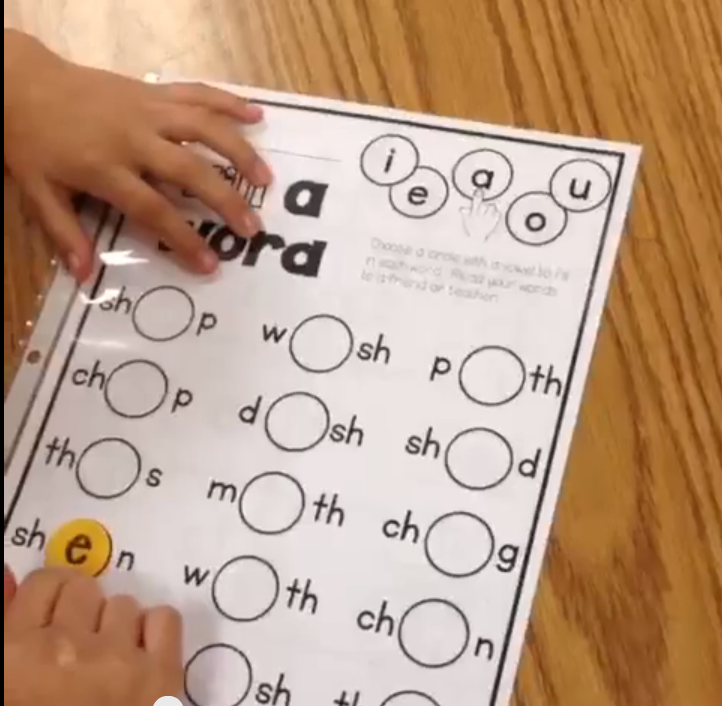
Activities for Decoding: Targeted Vowel Practice
Sometimes students need extra practice with vowel sounds, especially short vowels that can be easily confused. This can be woven into any part of your phonics lesson to build accuracy and automaticity. A few ways to do it:
- Vowel Substitution with Counters: Give students a chip or card with a vowel written on it. They place it in a word frame (like c_t) and read the word, swapping vowels to make new ones.
- Vowel Contrast Drills: Read or sort words that differ by only one vowel sound (sip vs. sap), drawing attention to the mouth position and sound.
- Highlight the Vowels: In a word list or sentence, students underline or highlight the vowel, say its sound, and then read the word.
- Vowel Sound Sorts: Sort words, pictures, or even nonsense words by vowel sound to strengthen sound-symbol mapping.
Activities for Reading and Building Decodable Sentences
Below are ways my students practice reading at the sentence level:
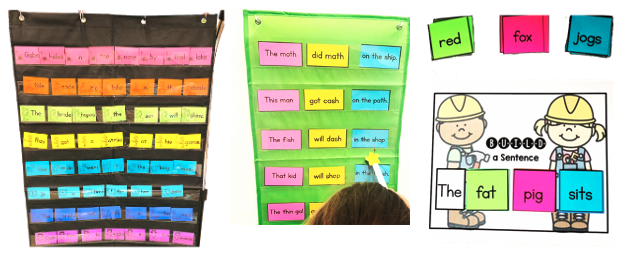
- My kids LOVE Sentence Scramblers! They are perfect for practicing decoding and building fluency because your kids have read and reread the words in order to put the sentence in order. You can make your own by writing a decodable sentence on index cards (one word per index card). Mix up the words and have your students put the sentence in order. I now also have a digital Boom Card version. You can find these Decodable Sentence Scrambles here.
- Sentence Building: The picture above shows two examples of sentence building, one that involves putting phrases together and the other that involves choosing individual words (sorted by part of speech) to build sentences. This reinforces both syntax and phonics skills, while allowing students to read their sentence aloud once it’s complete.
- Make it a Game with Spin a Sentence: Use a spinner with parts of a sentence (subjects and predicates) to create fun, decodable sentences. Students read the sentence they create, then swap out a part to make a new one. This keeps decoding practice playful and varied. Find this here.

Activities for Spelling
Word chains are a simple way to strengthen spelling skills while reinforcing phonics patterns. Students start with one word and change it one letter (or sound) at a time to make a new word. For example: cat → cot → coat → goat → goad → road.
- Students will spell the first word. For example, “sat”.
- Teacher will prompt them to spell a new word that differs by only one sound: Change “sat” to “sad”.
- Students change <t> to <d>.
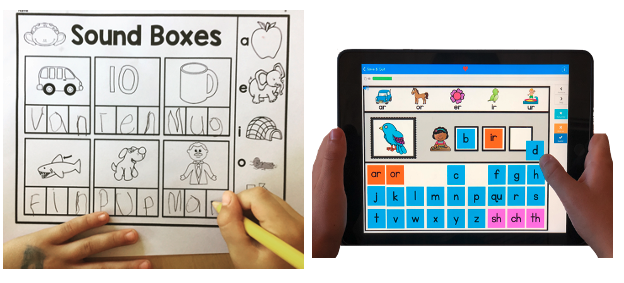
Sound boxes are a great way to connect phonemes (sounds) to their graphemes (letters or letter combinations) while spelling. Each box represents one sound in a word. Students listen to the word, segment it into individual sounds, and then write the corresponding letter(s) in each box.
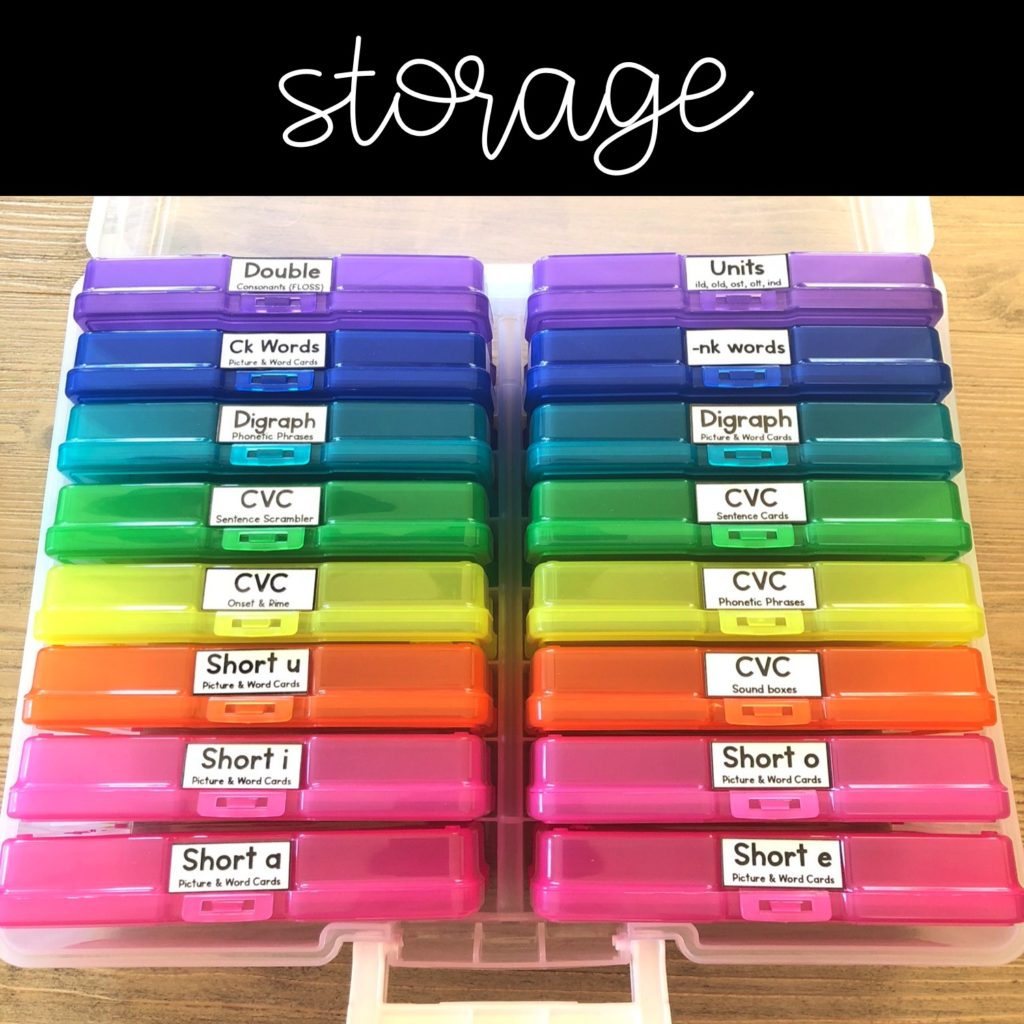
Storage
I’ve tried it all and this is my favorite way to store my materials. I use this storage box (found here) and for bigger items I use these long flat bins.
Small Group Lesson Structure
This is a lesson plan template that you may want to try out. This can be used for one-on-one tutoring or a small group.
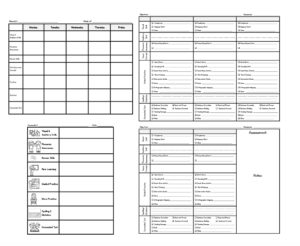
These are some ideas for things that may go in each section:
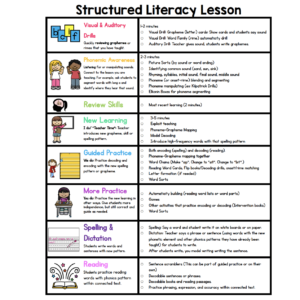
In a small group setting, you wouldn’t necessarily be able to get to all of those components every day, unless you were given a good chunk of time. With one-on-one tutoring, I do get to all of those parts and it is so effective. With my small intervention groups in school, I pick and choose each day, depending on time. The picture above has a little explanation (also included in the FREE download.) If you want more free downloads like this one, you may want to join my mailing list! Click HERE if you are interested in getting more resources and information like this.
I hope this post is helpful!
Resources for Phonics Intervention
If you are looking for a resource that includes tons of phonics practice with some great variety to use in a guided or independent setting, check out my Printable Phonics Intervention Packs. These provide students extra practice with decoding words and reading sentences to help master each phonics skill.

Click HERE to get these for several phonics skills.
SaveSaveSaveSave
