As you know, teaching sound-symbol associations, spelling patterns, and syllable constructions is essential for reading success. When I first got into what we call The Science of Reading, my main focus was integrating more phonics. Then, I started learning a bit about morphology and over the years I have been figuring out how to put it all together. I am now totally convinced that we need to teach morphology to our beginning readers early and often. If you haven’t already, please check out my first post about morphology. This will give you a little background before you jump into how to teach morphology.
You can start teaching morphology as early as kindergarten. You can do this orally at first and then by introducing common inflectional suffixes (like -s and -ed) after they have become proficient with decoding CVC words.
Teaching Morphology: Introducing the Concept Orally
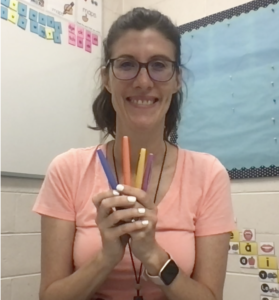
To begin teaching morphology, the first term I introduce is “base word”. Believe it or not, I teach this in kindergarten! Here is a script you could use to introduce the concept of a morpheme using kid-friendly language.
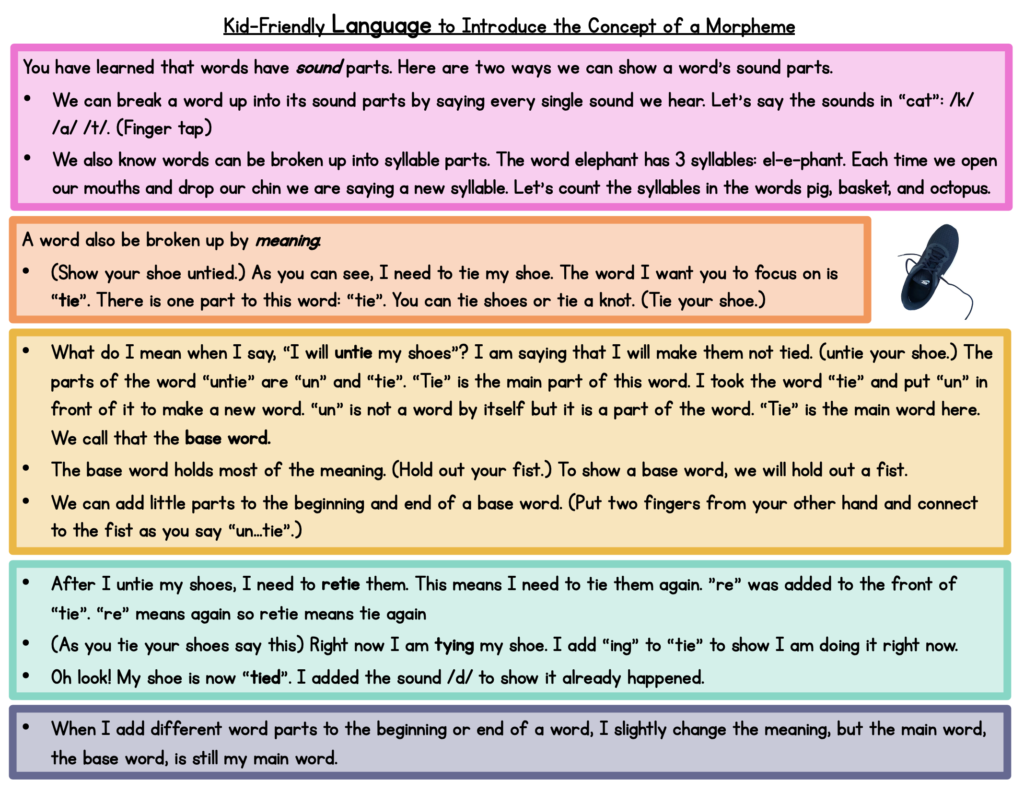
You can then follow up by listening for word parts in your normal day: During calendar time, when a student announces the weather as “rainy”, you can ask what they think the base word is. You can give prompts like, “It is raining” outside right now. Yesterday, it also rained. Will it rain tomorrow?” Use the hand motions (the fist and the two fingers) as visuals.
Teaching Morphemes in Written Language: Begin with Suffixes
I integrate morphology instruction right off the bat while students are reading CVC words. The easiest way to do this is with suffix -s. Kids understand the concept of plural, even if they don’t know that exact term.
Begin introducing suffix -s orally.
- Show one book and ask, “What is this?”
- The students would then say, ” a book”.
- Say, “Yes, this a book. Book is the base word.” (Hold out your fist.)
- Grab a few more books and ask, “Now what do I have?” Students would reply “books”.
- Then, bring their attention to what sound was added to the word “book”. After identifying the sound /s/ was added, point out that that little sound tells the listener that there is more than one book.
- Hold out your fist and say, “book is our base word. When I add the sound /s/, it becomes more than one book.” Repeat the word book holding your fist, then add to two fingers to the fist as you say /s/.
To hear a longer explanation, click here (or on the picture below) for a video I made.
Teaching Suffixes: Connect to print
- Ask your students: “What letter represents the sound that we added?”
- The letter <s> can be used to show more than one when it is added to a base word.
- When it is added to a base word, it is not just a letter. It is a word part called a suffix! There are many suffixes.
- A suffix is not a word by itself. It is added to a word to slightly change its meaning.
- Using colored letter tiles, build the word “cat”. Read the word together.
- Ask, “What do you picture when you say this word?” (one cat)
- Add a purple tile with an -s. Read the word together. “What is the word now?” (cats) “What do you picture?” (More than one cat).
- Point out that the suffix -s is a different color tile than just the letter <s>. Explain that you did that because it is not just the letter <s> that represents the sound /s/. It is also a suffix, that carries meaning.
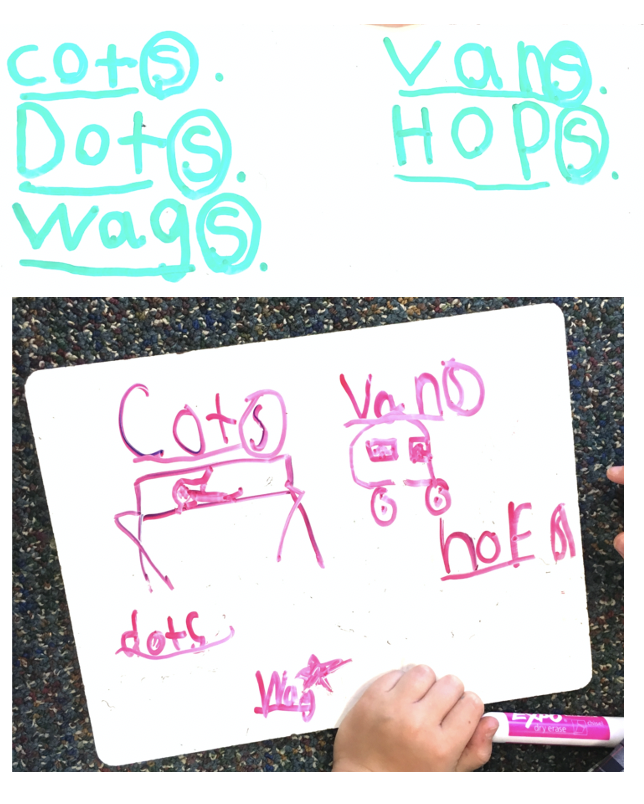
- Rewrite the word and ask, “What is the base word?” Underline “cat” to show the base word. Circle the suffix.
The goal here is to help kids become consciously aware of base words and suffixes that they are already using in their everyday speaking.
If you are interested in a detailed lesson and materials to teach suffix -s and -es, check out my morphology units.
Teaching Suffixes -es, -ed, and -ing
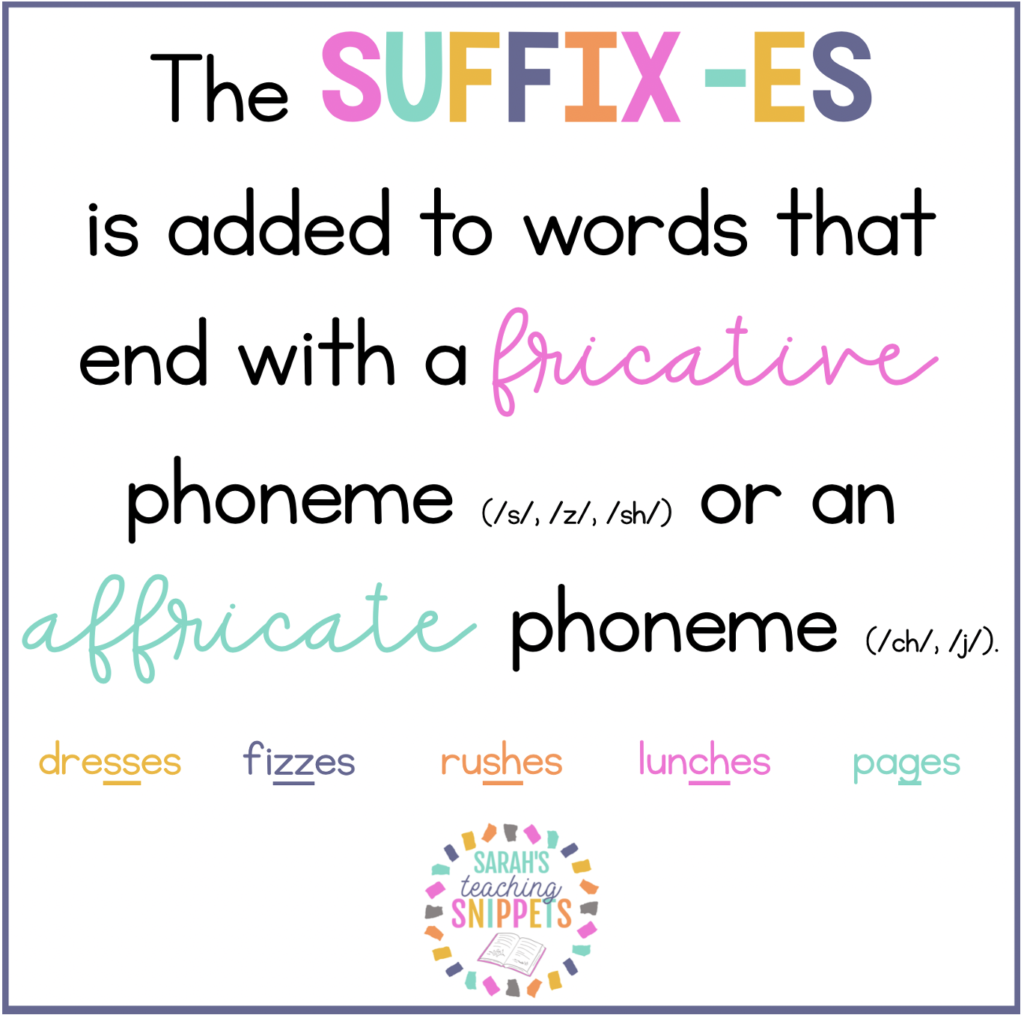
I teach suffix -es after I teach digraphs. Suffix -es is used in place of suffix -s when the base word ends with the following sounds: /s/, /z/, /ch/, and /sh/ so I teach my students that when a word ends with s, z, ch, sh, or x, then we use suffix -es in place of suffix -s. (Words that end with <dge> or <ge> also use suffix -es, but I teach that later with silent e.) To see two short videos explaining how I introduce suffix -es, click on the images below.
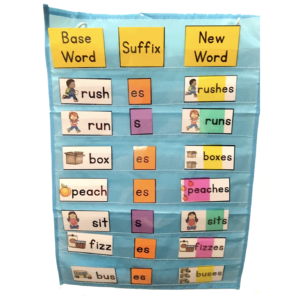
To give students practice with when to use suffix -s and when to use suffix -es, I do this activity. This activity is sold in my store or you can easily recreate it using note cards. Click on the picture below to watch a video about this activity.
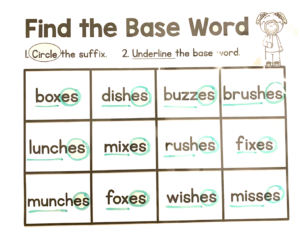
I also continually have my students unline base words and circle suffixes. This particular page is used when I teach suffix -es. You can find it here.
Suffix -ed
After suffix -es, I teach suffix -ed and -ing after teaching consonant blends. (For my full sequence, click here.)
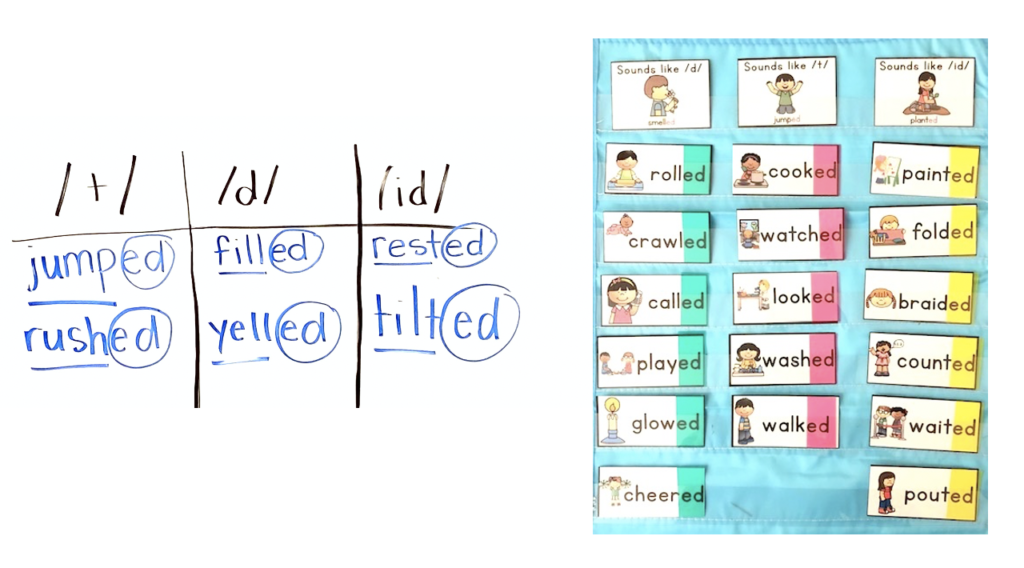
The suffix -ed is fun to teach because it has three pronunciations: /d/, /t/, and /id/. It is helpful to explicitly point this out to our students. Always start by explaining the meaning of the suffix. In this case, -ed shows that something happened in the past. Explain to your students that when we want to say that something already happened a second ago, hours ago, days ago, or a million years ago, we use the suffix -ed. When we’re talking we use three different sounds to express this. I use this activity to teach this concept:
To do this activity: Say a word that has -ed. Listen for the ending. Sort the words based on the sound that the -ed makes. Practice identifying the base word.
There is an explanation for when to use each sound. I think it’s a bit of a cognitive overload to ask kids to remember it (I can’t even remember most of the time). However, if they ask I explain that:
- /id/: Used when the base ends with /t/ or /d/
- /t/: Used when the base ends with an unvoiced sound.
- /d/: Used when the base ends with a voiced sound.
Again, I do not try to drill that info into my students’ heads because it is too much to remember and I find that kids are great at being flexible with adjusting the sounds of -ed when they think about the meaning of whatever word you are using. I only explain that if there is a curious student. Students whose first language is not English will need more guidance with figuring out which sound to use so I just supply the correct sound when needed. I don’t ask them to guess which is correct.
Teaching Morphology: Spelling with Suffixes
To help with decoding and spelling, I explain to my students that when we see or hear a suffix at the end of a word, it is helpful to read or spell the base word first, then add on the suffix. For example, when we see the word “bugs” on a page, we would cover the <s> and decode “bug” first. Then we simply add on the suffix -s sound. (I do go into the two sounds of suffix -s, /s/ and /z/ as well. I find that kids have no trouble at all quickly switching back and forth between the two as needed.)
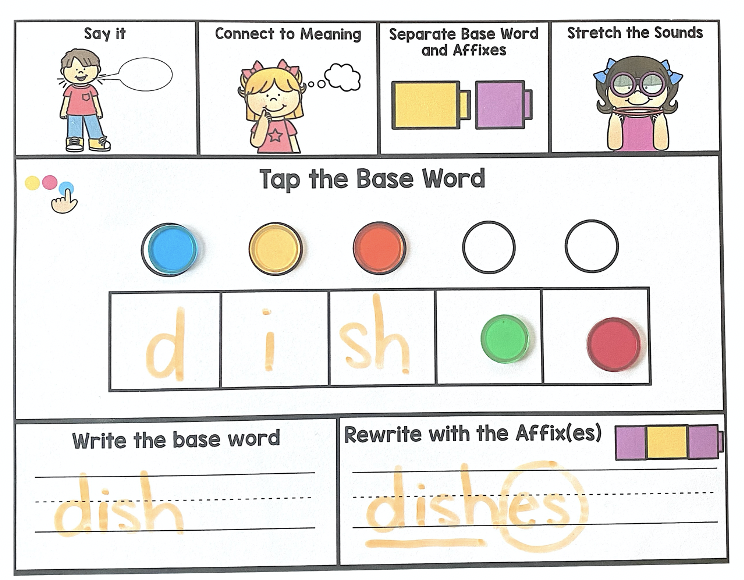
When spelling words, it is even more important to encode the base word first, then add on the suffix. I also often have them underline the base and circle the suffix. They catch on surprisingly quickly!

In fact, when I’m working with sound boxes/phoneme-grapheme mapping, I only have them use the boxes for the base word. The suffix is always outside of the boxes. Here is why: Morphemes don’t necessarily match up to pronunciation. You see it right away with suffix -ed making three sounds (/d/, /t/, and /id/). You also sometimes don’t hear all of the sounds of the base word. Think about the word “bats”. Kids often hear “bas” without the <t>. If they learn to identify the base word first, they can hear the whole word, spell it, and then add on the suffix -s. I want to drill this in early so I never have suffixes in sound boxes. I created an alternative spelling board to reinforce this. You can find this free spelling board here.
Teaching Morphology in Context
I like to weave in morphology instruction with my phonics instruction. I want to give my students ample opportunities to practice decoding connected text. Here are some examples of how you can integrate teach morphology while working on phonics.
Teaching Suffix -s Within in a Sentence
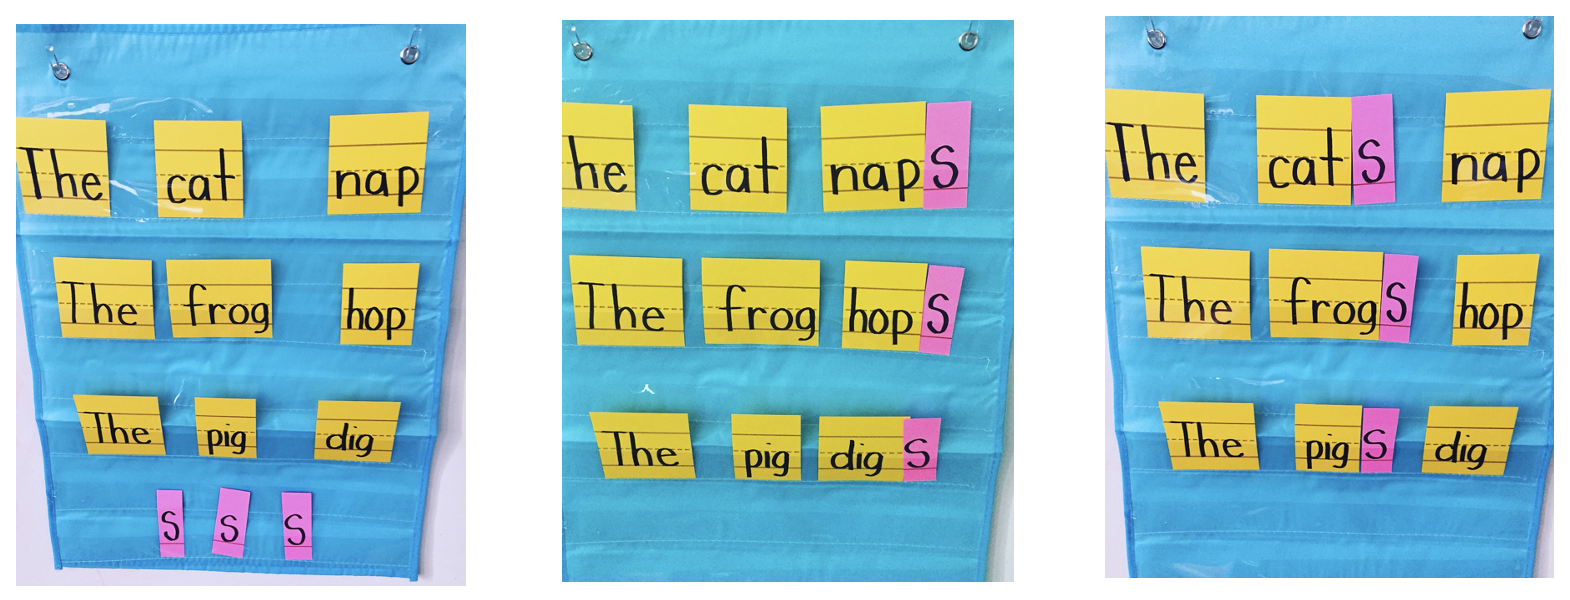
As you know, the suffix -s has two jobs: It makes a noun plural and it also is added to verbs to show. To illustrate this, I like to use this activity:
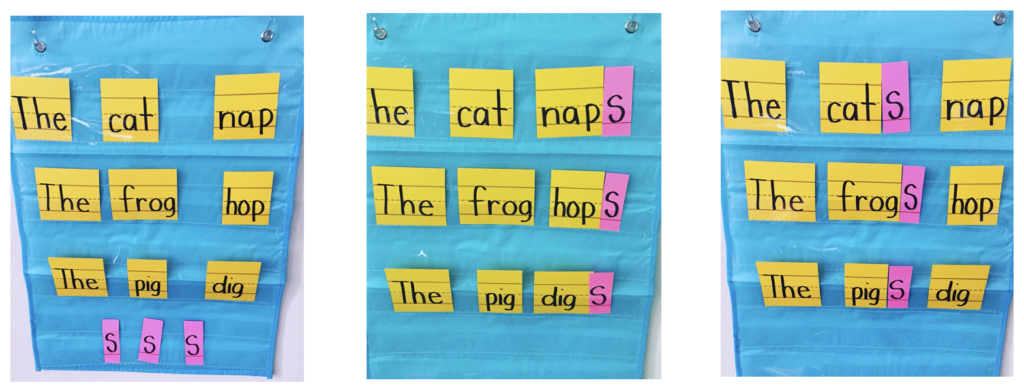
I move the suffix -s around to show how the sentence changes. It also shows students when a verb uses suffix -s and when it does not. This is a simple way of introducing grammatical structures in a sentence. This activity is done with kindergarten students. It uses the most basic sentences, but there is a lot of learning happening here!
Here is another way to do that same activity. Click here for a video explanation.
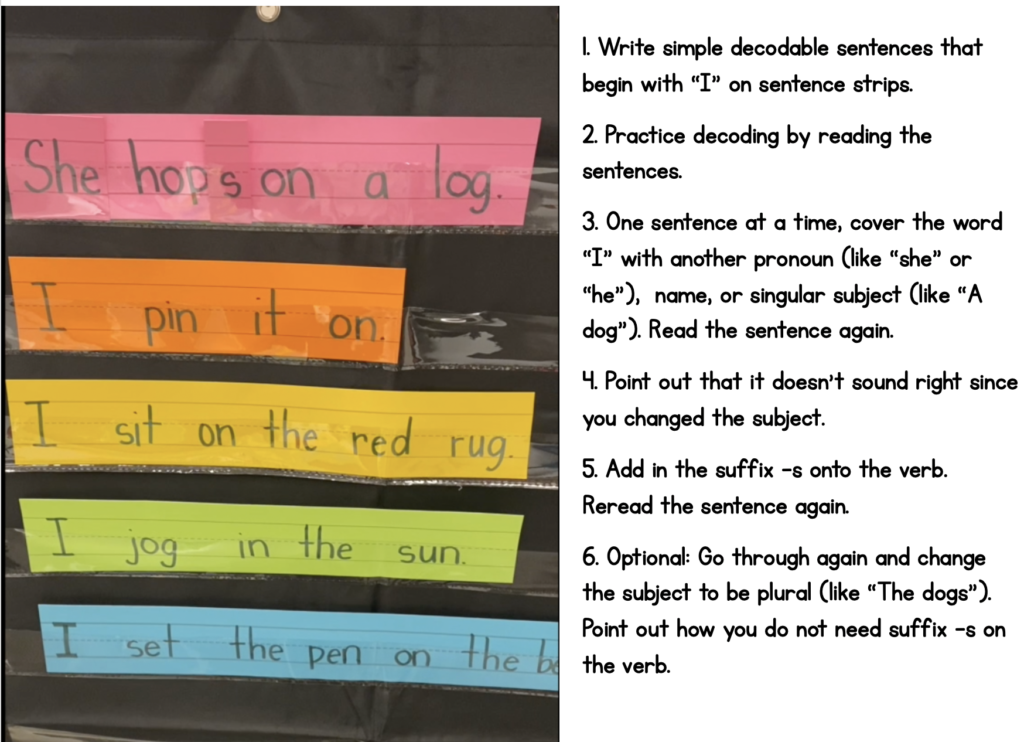
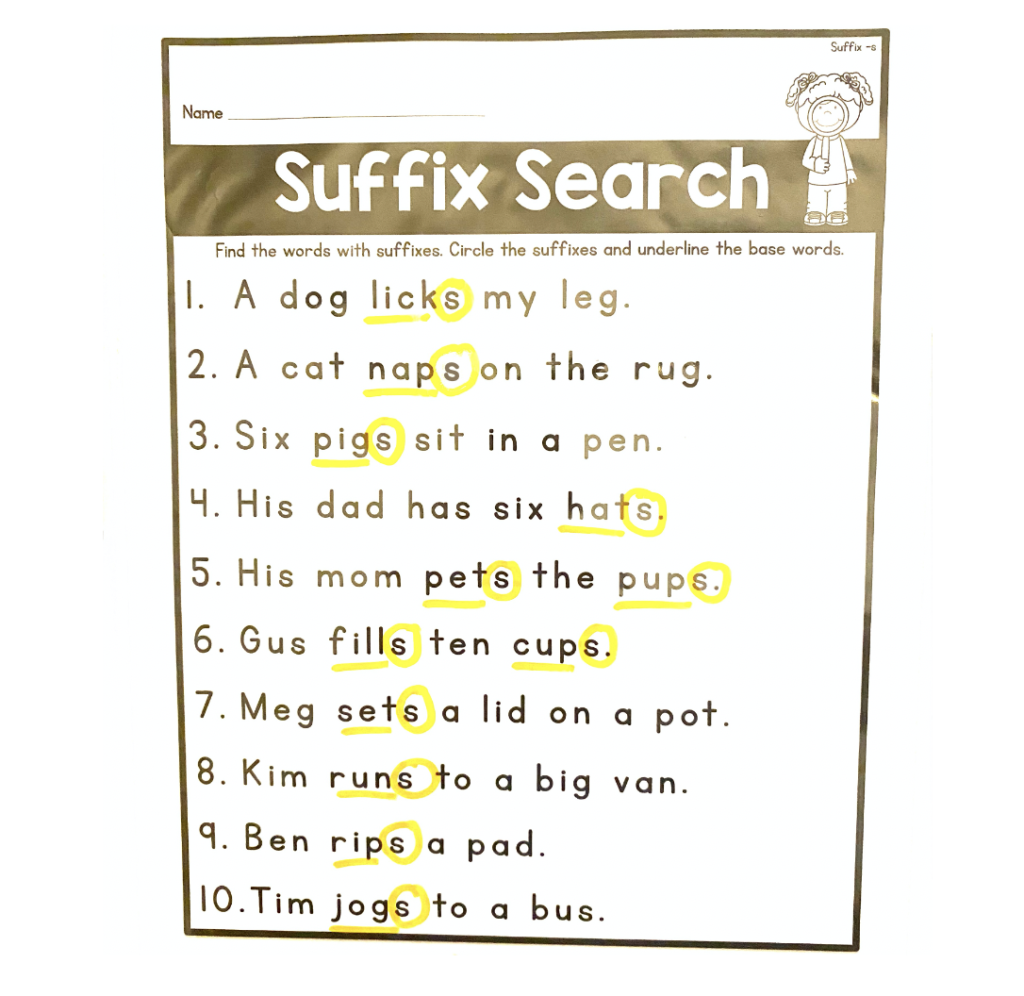
With a Suffix Search, students practice decoding and morphology. This page is part of my Suffix -s and -es pack, but I am also sharing this page with you for free! Click here to grab this free page.
Choosing the Correct Suffix
Another activity I like to do is choosing the correct suffix in a sentence. This activity can be done once you have taught -s, -es, -ed, and -ing.
- Write sentences on chart paper. I like the make the sentences decodable, so students can practice decoding words with whatever grapheme of syllable type we are working on.
- Leave out the suffixes from the verbs.
- Write those same suffixes on sticky notes.
- Students will read the sentence and choose the sticky note with the correct suffix.
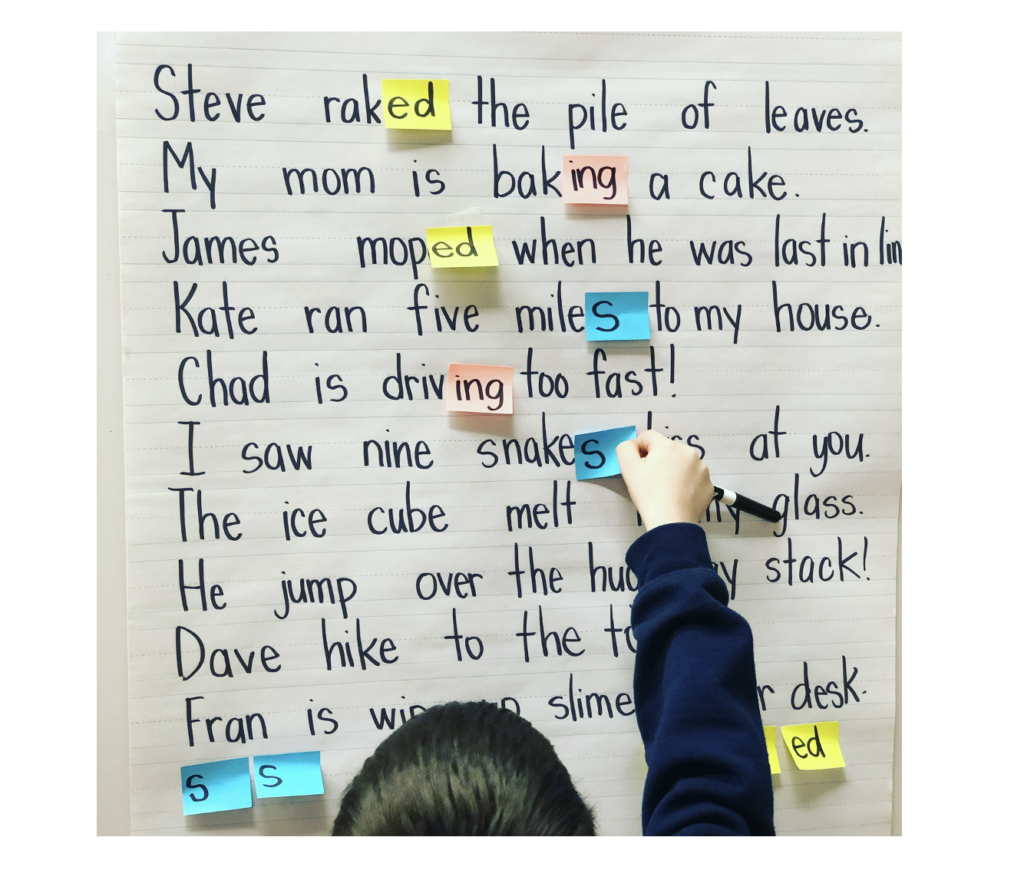
In the picture above, we are working on silent e words. I left out the inflectional suffixes. This activity requires two steps:
- They first have to choose the correct suffix based on the grammatical structure of the sentence.
- They have to figure out whether or not to use the Dropping Rule. The Dropping Rule states that when a word ends with silent e, you must drop that e before adding vowel suffixes. So, in this case, they will use the sticky note to cover the e before adding -ing or -ed, but they will not cover the e when adding -s.
Introducing Prefixes
I don’t teach prefixes as early as suffixes, but it can still be taught in the primary grades. I think second grade is a great time to introduce prefixes. In first grade, you will come across them in texts and I will use common and simple prefixes like “un” or “re” in word matrices (see below), but I don’t usually explicitly teach until second grade.
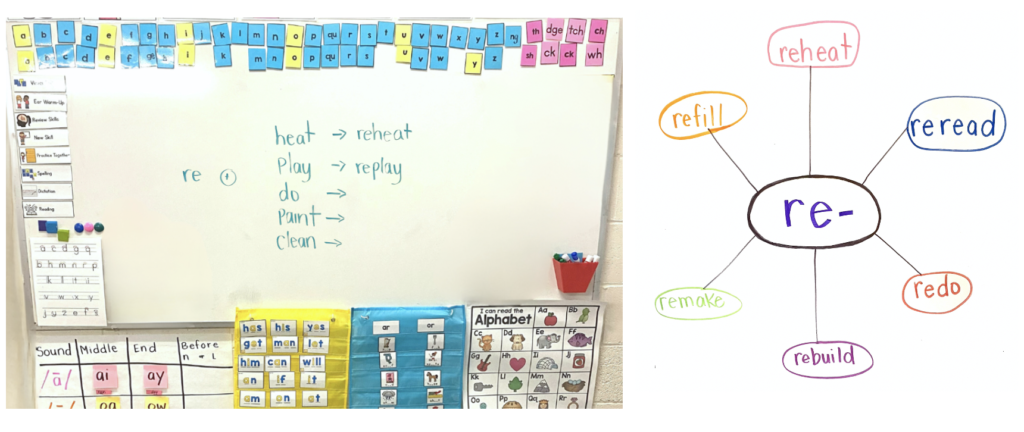
I don’t necessarily just begin with the most common prefixes. I start with the prefixes with a clear and obvious meaning and that can attach to single syllable base words. This can be tricky because most prefixes attach to root words, which isn’t as straitforward for our younger learners. The prefix re- is a great one to start with becuase it has a consistent and easy-to-understand meanign (again) and it can be attached to several one-syllable base words. The others that can be introduced early are un-, dis-, pre-, and mis-. I find myself moving my prefix instruction up in my sequence a little each year. You see, I’m still experimenting with teaching morphology!
A simple activity that requires no prep is to write a bunch of base words on the board. Together read those words and connect to meaning by defining them or using them in a sentence. Next, write the prefix on the board. Combine that prefix with each base word. Write the new word. Discuss how the meaning changed (reheat means heat again) and use the new word in a sentence.
You can also make a simple word web. Have your students brainstorm words with re-. They don’t need to be able to read or spell these words necessarily. It can be an oral activity where you write the words in the web. For each word, make sure to identify the prefix and base word and how the prefix’s meaning affects the base word.
Other Ways to Showcase Morphemes
As much as possible, I want to show students how morphemes go together to make words. Once you have taught a few suffixes, you can start to show students how they all work together.
Mix and Match Base Words and Suffixes
This is an activity I like to do with first and second-grade students.
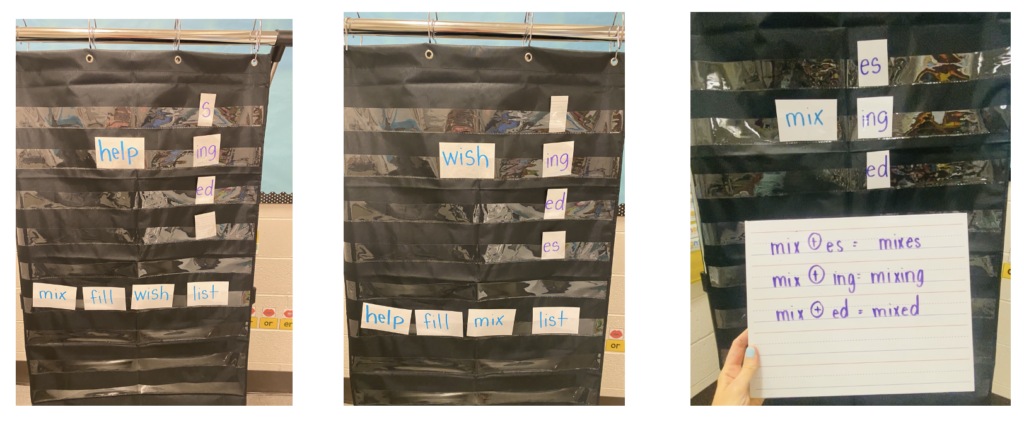
Write some base words that your students can decode on note cards. Place them in a pocket chart. Write the suffixes you have introduced. Early in first grade, I have introduced -s, -ed, -es, and -ing. Choose one base word at a time. Match the base word with each suffix. Decide which suffixes work with that base. For example, suffix -es does not go with “help” (you would use suffix -s), but it does go with “wish” (so you would turn over suffix -s since it doesn’t work). Have students write a word sum on their whiteboards, as shown in that picture. (The idea of a word sum comes from Pete Bowers.) Use each word in a sentence with the different endings. Reinforce the terms base word and suffix.
Go on a Word Hunt for Suffixes
Most texts are filled with suffixes. A simple activity to do after teaching suffixes is to have your students go on a suffix search after reading a text. Again, this is weaving morphology instruction into your regular phonics lessons.
The phonics focus is vowel teams that spell long a. As you can see, there are plenty of words with familar suffixes. This activity just helps students take a moment to be conscious of them. There is also an opporunity to review another suffix rule. The 1:1:1 Doubling Rule states that you will double the final consonant before adding vowel suffixes if a short vowel comes before that consonant. It’s called the 1:1:1 Rule because it must be a one syllable word with one vowel followed by one consonant. This formula tells the speller to double that consonant. Here, the word is already spelled for them, but they have to go backward and remember that the base word only has one of the consonants.
To get this free resource, click here.
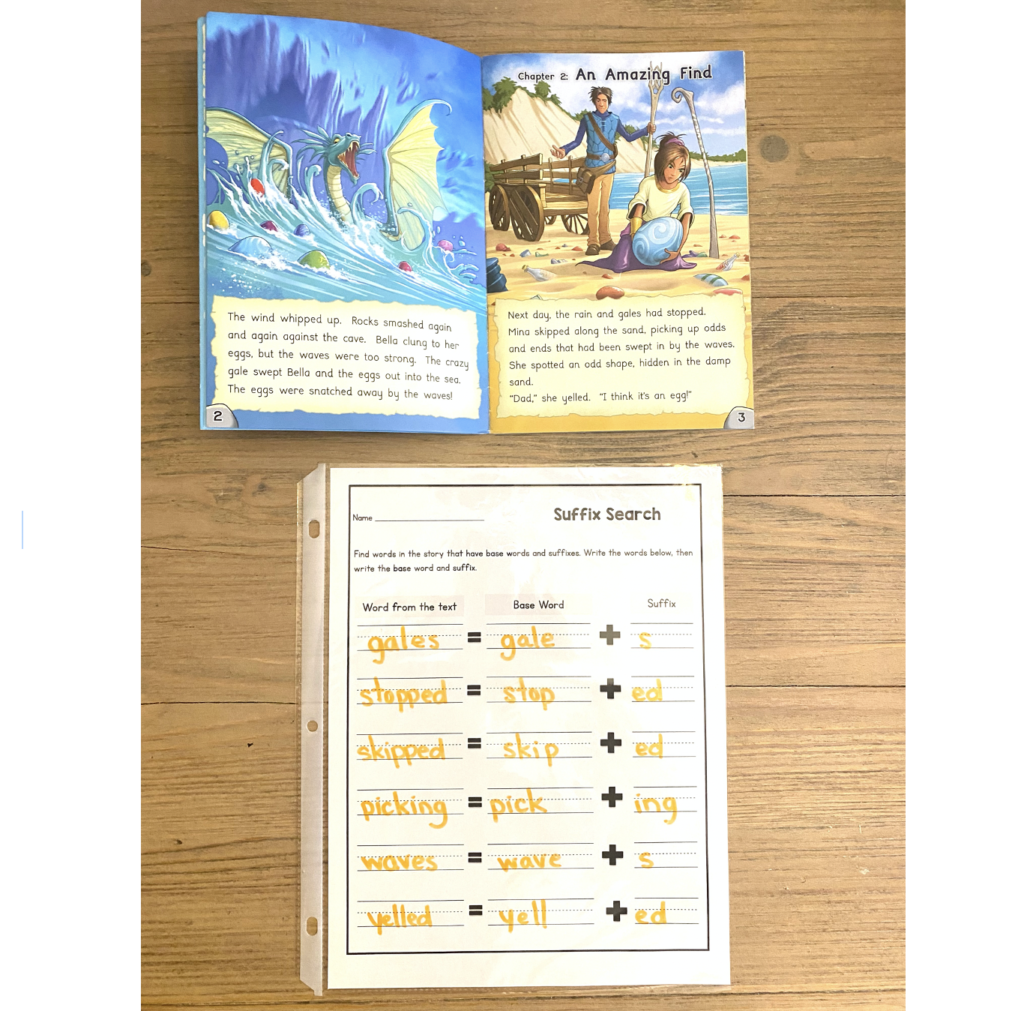
This book is from PhonicsBooks.
Expand a Word
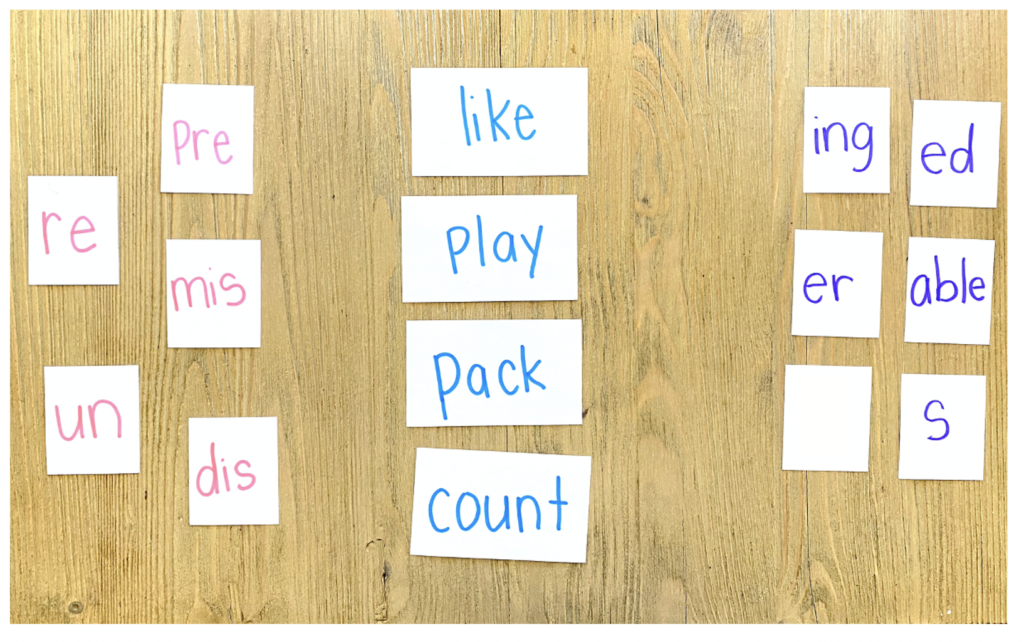
This is a fun way to show students how many different words you can make with the same base word. This will set the groundwork for later when they start looking at root words and all the different words you can make by adding different prefixes and suffixes. Mix and match different prefixes and suffixes to build new words. Discuss how the meaning changes.
Introducing Word Matrices
A great tool for teaching morphology is using a Word Matrix. As far as I know, Pete Bowers created the concept. It’s brilliant! In my next post I will go more deeply into word matrices, but for now I want to show you how you can make a simple word matrix with our younger students.
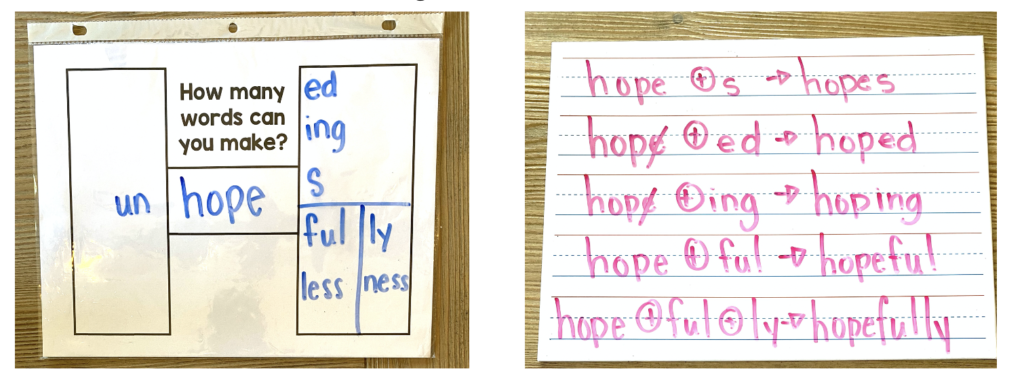
The base word “hope” is a word students are able to decode in first grade (some in kindergarten). I teach silent e in first grade so this is when I would use this. Explain to your students that with a word matrix, the base (or root) goes in the middle. On the left, we will put any prefixes that go with that base word. On the right, we’ll put any suffixes that go with that base word. It’s always easiest start with the suffixes that the learn early on: -s, -ed, -ing. We would then brainstorm other words with “hope” in it. You can guide them by saying something like, “How do you feel when you are full of hope?”
The word matrix shows the morphemes that can be combined to make new words. A word sum (shown on the right) shows how to compbine those morphemes to spell the word correctly. This is where some suffix rules may or may not come into play. Notice how I slashed through the silent e before adding vowel suffixes. That shows the Dropping Rule.
Although at some point I will want to explicitly teach each suffix and prefix, I don’t necessariy need to do so before using them in a word matrix. After all, our studnets are using these morphoemes every day in their own speech. For exmaple, to get to the word “hopefully”, I’ll show my students that we need to add two suffixes: -ful and -ly. I’ll tell that that later we will explore those suffixes more, but for now I will just tell them that -ful means “full of” and -ly shows how something is done. I am laying some the groundwork here! What I notice is that by the time I get to some of the more complex morphemes (like -ion), my students have seen it over and over already and are primed to learn more about it!
To see a video about making this matrix for hope, click here.
To watch a video about making a word matrix for “luck“, click here.
To watch a video about making a word matrix for “help“, click here.
To watch a video about making a wrod matrix for “play“, click here.
Stay tuned for my next blog post about teaching morphology in the intermediate grade. There, I will get into more complex word matrices!
To see all of my morphology resources, click here.
